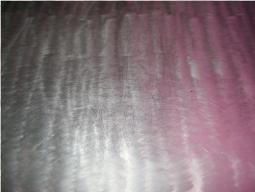
Wet Sanding Metal
Our new kitchen has great feature for the baking center an all Aluminum table. Here are a few tips for bringing a nice finish that is easy to clean. Wet sanding is a method for removing scratches or minor defects in metal and painted surfaces. This method uses the grit from the sand paper which combines with water to form an abrasive slurry paste. An orbital sander is used to rub the paste against the metal surface to remove the defect or scratch. Wet sanding paper is different from regular sanding paper. Wet sanding paper has a heavy duty, fabric type backing to resist tearing. The fabric backing is able to absorb water without falling apart. By following the simple steps you can quickly wet sand most scratches or defects in metal to a smooth finish.
One
Clean the area to be sanded thoroughly from any dirt and grease. First spray water on the afflicted scratch and wipe clean. Then apply the de-greaser, thoroughly wipe and rinse with the spray bottle water.
Two
Attach the 180-grit wet sandpaper to the orbital sander and thoroughly spray the area to be sanded. Gently rotate the orbital sander over the scratched area. Be sure to keep the area wet as you work. Observe the amount of work the paste is doing. Once the major portion of the scratch or defect is removed stop sanding.
Three
Clean the area again, first with the water to remove the majority of grit, then with the de-greaser. The spot area should be thoroughly cleaned of all grit paste. You will find this is a repetitive process. The goal is to gradually remove the defect by sanding with progressively smaller grits to eventually polish the metal.
Four
Attach the 320-grit wet sandpaper and repeat the method as in step two. Be sure to keep an eye on the progress of the sanding area. Your goal is to only remove the scratch or defect and not a heavy amount of the surrounding material.
Five
Repeat the cleaning and sanding methods until you reach the 600-grit wet sanding paper. This grit will be the smallest in size. You may want to spend more time with the 600-grit wet sanding paper to give a high shine polish to the metal. Be sure to use plenty of clean water in order to keep a good paste consistency to the sanding area.
Be sure to keep plenty of clean rags on hand, never reuse the rag.
This method can also be used to polish entire pieces of metal.
Only use the clean surface of the rag to wipe the area so you do not contaminate the surface with the old heavier grit sizes. This will cause deeper scratches to the finished area.